Monday, November 18, 2013
Work Work Work
Work has been consuming my life lately.... no time for bloggin. I've got a TON of back posts I want to share with you so stay tuned come this Winter Break and I'll be back with some goodness.
Monday, July 29, 2013
School Blog
As you know, I'm a teacher and I just got a job at a new school in a new grade level.
Are you a teacher, parent, teacher-to-be or just interested in my classroom?Want to keep up with what's going on in Team 112? Click here and follow me!
Are you a teacher, parent, teacher-to-be or just interested in my classroom?Want to keep up with what's going on in Team 112? Click here and follow me!
Sunday, July 21, 2013
Coming along
The classroom is coming along. I've been putting up bulletin boards, moving furniture, sewing, sketching/cutting/coloring bulletin board characters and starting to prep first week of school stuff. I have also spent some time leveling all of my classroom library books with the DRA reading levels. It took me about a half of a day to do all of the books I had at school, round two and three will come when we get more out of storage!


Books, books book.

Cutting out something I sketched. Any guesses as who/what I sketched?
Wednesday, July 3, 2013
Changes
This year I have been hired to teach 3rd grade at a new school. I am thrilled as I have never taught 3rd grade before, but am a bit nervous to start the year out, as I always am with a new grade level. It's always a little nerve racking when you are at a new job, with new co-workers, a new grade level, AND you have never taught that grade level before. I am excited and up for the challenge (and a little nervous too). Luckily I have been texting one of my co-workers and have met in person the other co-worker of mine, and I know we are all going to work together nicely. So as of now there are 3 of us, but soon will be 4. I was able to sit on the interview team and hopefully we'll have our 4th teacher soon.
I got a chance to go into my new classroom to see what I had to work with and took a few photos. Check out my new digs (none of that stuff piles up around the room is mine).


I got a chance to go into my new classroom to see what I had to work with and took a few photos. Check out my new digs (none of that stuff piles up around the room is mine).

Here is the door to my room. I am loving the shadow box outside of my room. You know I'll do something crafty with that!

Yes that is a Smart Board. I am excited to learn how to use that bad boy!

Why that board has wood paneling but it's got to go.

Windows.... need to measure, I'm going to make curtains.

Loving the built in bookcase but I am not loving that my cabinet only has one door (it's suppose to be that way I was just surprised when I saw it).

Can't wait to move in. July 10th is the magic day.
Monday, June 17, 2013
Churro Cheesecake Squares aka, Cinnamon Cheesecake Squares
Going through my never ending binder of print out recipes that I have, I stumbled across this one for Churro Cheesecake Squares. It sounded so amazing that even though the hubs isn't a cheesecake fan I had to try it out.
Not sure where it was from as there is no web address on this print out. But thank you whoever you are who shared this yummy recipe on the web.

Here's the skinny on how to make these yummy treats.
Ingredients
* 2 cans of Pillsbury Crescent Dinner Rolls (I used the flakey butter kind)
*2 packages of Cream Cheese (The 8 oz. bricks)
*1 tsp Vanilla
*1 egg, beaten slightly
*1 cup sugar divided
* 2 Tbsp. ground cinnamon
Directions
1. Preheat the oven to 350 degrees.
2. Mix together (I used my stand mixer but you can use a hand held) egg, 1/2 cup of sugar, vanilla, and cream cheese.
In a separate cook mix together the rest of the sugar (1/2 c) and the cinnamon and set it aside for later.
3. Spray a 9X13 pan with cooking spray and sprinkle half of the cinnamon/sugar mixture evenly on the bottom of the pan.
4. On a piece of parchment paper, roll out one tube of the crescent roll dough and press the seams together so it doesn't separate while baking. *Tip: do this while the dough is cold so it doesn't stick as much.
5. carefully lay the dough in the pan.
6. Spread the cream cheese mixture onto the dough evenly.
7. Unroll the other tube of chilled dough and do exactly the same thing and lay it on top of the cheesecake mixture.
8. Spread the remaining cinnamon/sugar mixture ontop of the dough evenly.
9. Pop it in the oven for about 30-35 minutes or until golden brown.
Wasn't planning on posting this recipe so the photo isn't the best.

I made a little mistake (adding the cinnamon sugar mixture) into the actual cheese cake because I misread the directions however, it still turned out REALLY good. I gave most of the squares to my neighbors since I knew I'd end up eating the whole 9X13 pan of them. They were extremely happy last night when I dropped them off. Mr. H. said: "Anytime you make cheesecake anything feel free to bring it on over to us". HA!
Monday, June 10, 2013
Chocolate & Peanut Butter Chip Pretzel Cookies
It is Summertime and I officially don't have to get up early, drive to work and come home so tired I don't even want to make dinner, YAY! What does that mean? It means, it's time to do all the things that I have no time or energy for during the school year like crafting and baking! I had made my neighbors some cookies as a "Welcome to the neighborhood" treat, and when I told them I'm going to be baking a lot this summer they seemed very happy about that. Ha.

My first recipe of the summer is a sweet treat.
Chocolate and Peanut Butter Chip Pretzel Cookies
Ingredients:
- 1 1/2 cups of all purpose flour
- 1/2 tsp. of salt
- 1/4 tsp. of baking soda
- 1/2 cup of butter at room temperature
- 1/2 cup of tightly packed light brown sugar
- 1/3 cup of granulated sugar
- 1 egg (beaten)
- 1 tsp vanilla extract
- 1 cup milk chocolate chips
- 1/2 cup peanut butter chips
- 1/2 cup broken up pretzel pieces
- Pretzel Salt or Sea Salt or Kosher salt
Directions:
- In a medium bowl, stir the flour,
baking soda, and salt. Set aside.

- In the bowl of your stand mixer (or if you don't have one in a large bowl and a hand mixer), beat the butter and sugars
together on medium speed until light and fluffy (about 2-3 minutes).

- Beat your egg
- On low speed, slowly add the beaten egg and vanilla extract and combine. *Tip: make sure you scrape down the sides of the bowl.

- Add the flour mixture and beat just until there are no more streaks of flour.
- Add the chocolate chips, peanut
butter chips, and pretzels.

- Cover and refrigerate for an hour.
- Preheat the oven to 350F. Line baking sheets with parchment paper.
- Scoop out tablespoonfuls of the dough
and sprinkle with pretzel salt. *Tip: These cookies don't spread out that much so shape them how you'd like them to look when they come out of the oven.

- Leave about 2 inches between each ball and bake for 10 minutes. Like crunchier cookies, leave them in for a minute or two longer.
- If you prefer crispier cookies increase the baking
time by 1-2 minutes.


This makes about 2 dozen cookies.
Enjoy

I am not sure where this recipe came from as I just have it in a binder from a word document that was typed out. I know there are quite a few recipes out there like this one though.
Monday, June 3, 2013
Baby Shower Gift- Owl
We just had a baby shower at work for a co-worker who is having a boy. I made a sweet little stuffed owl and she sent me a photo of where she put it in the baby's room so I thought I'd share it.
The owl is yellow and white chevron with a huge white with black polka-dots heart on it's tummy and a small one on it's lower back.

The owl was really easy to make and took around 15 minutes or so.
The owl is yellow and white chevron with a huge white with black polka-dots heart on it's tummy and a small one on it's lower back.

The owl was really easy to make and took around 15 minutes or so.
Thursday, May 30, 2013
Cheap, Easy and OH SO CUTE, gift for a Teacher/co-worker
Well I have one more day of school and then I am on Summer Vacation! WAHOO! I have several co-workers that I work with closely and I wanted to give them a little something, a token of my appreciation, if you will. I found these cute FREE printables of lemon slices that say "Start your summer with a squeeze" from Poofy Cheeks and they inspired me to come up with the gift you are about to see.
What you are going to need:
Glasses: Dollar Store
Lemons: Big bag for a few bucks at my local grocery store
Paper Straws: Had them on hand but you can get them for a few dollars for a pack of 20.
Yellow Flowers: Dollar Store 3 for $1.
Yellow Napkins: $1.50 from my local grocery store.
All you do is arrange 2-3 lemons in your glass
Adjust your straw in the glass where you want it
Twist the flowers (with the wire on the back) to the straw
Print, cut out and write on the back of the cute lemon card from Poofy Cheeks
Slide the print out into your glass however you see fit and BAM, you are done.
It's cute, thoughtful and very inexpensive to create!

With the napkin at the bottom to fill the space

Without the napkin at the bottom

A cluster of cuteness.

close up!
I'm going to sneak them into my co-workers boxes in the teacher's workroom tomorrow morning. I hope they like them.
Thank you so much to Poofy Cheeks for so generously providing the FREE printable and inspiring my creation! I just know these are going to be a big hit!
Thank You Gifts
Cheap and easy thank you gifts for my Team at work are in the works.
Here's a sneak peak!
More to come soon.
Here's a sneak peak!

More to come soon.
Sunday, May 12, 2013
DIY Desk Pad
Well Pinterest has come through yet again. I found a great little cheap project, decorating a desk pad, to give my desk a little extra cuteness.
It's super simple and easy to make! Here's what you need:
Spray Adhesive
IKEA or any other clear Desk Pad (it's about $6)
Any wrapping paper you'd like to do.
What ya do:
1. Precut an over sized piece of wrapping paper (so it will hang over the desk pad.
2. Spray the adhesive on side of the clear desk pad that will rest on your desk.
3. Carefully lay the wrapping paper onto the desk pad. *I lined up one side of my wrapping paper to the bottom of the desk pad.
4. Smooth out the wrapping paper.
5. Cut off the the excess wrapping paper and BAM, you are done!
*Be careful where you spray, I did it outside on the porch, then hosed the patio where the glue got on the concrete.
Here's the finished product:


Sunday, May 5, 2013
Themed Gift Giving
My little cousin had a dance performance this weekend and the theme was 'There's No Place Like Home'. So I wanted to get her and her cousins (who were also dancing) a little something to show them how wonderful I thought they were.
This is what I came up with:

I filled a clear bag with this REALLY PRETTY fabric that was red with hints of gold sparkles that I bought with my 50% off coupon to Jo Anns's to represent the ruby slippers, I filled it with the Hershey Treasures which are wrapped in gold foil, to represent the Yellow Brick Road. Also in there I put a bottle of gold glitter nail polish, and a sweet keychain, that has a which hat, monkey, and shoe charm and then a bottle cap charm with an image of the ruby slippers on it.
The girls loved them and I am so happy!
Before the show!


The program, and on the back were the group photos and names of each performer.
Thursday, May 2, 2013
Teacher Appreciation Dinner
I just got home for the Teacher Appreciation Dinner the PTA at my school hosted for us. It was the kick off to the festivities that will happy next week they said. So excited! It's always nice to feel appreciated! I am so blessed to work with the people I do, and the kiddos as well.
Here's my outfit of the night (blogging from my phone so I don't know if this will work, but we'll give it a try):
Shoes: American Eagle
Top: Anthropologie
Shell: Maya Star (local shop).
The theme of the dinner was Hawaii.
Here is the food, drinks, and goodie bag:


Here's my outfit of the night (blogging from my phone so I don't know if this will work, but we'll give it a try):
Shoes: American Eagle
Top: Anthropologie
Shell: Maya Star (local shop).
The theme of the dinner was Hawaii.
Here is the food, drinks, and goodie bag:
Saturday, April 27, 2013
5K9 Walk/Run
There is still time to help support the Petco Foundation by donating to the cause. Help me help furry friends in need. Any amount helps.
Thank you to those of you who have helped me my donating a total of $250 so far! Sammy, Pudge and I (as well as all of the dogs that are going to be helped by your donations) thank you from the bottom of our hearts.
Here's where you can donate: My page
Hugs, love, and snuggles,
Stacey, Sammy and Pudge

Monday, April 22, 2013
Hair Tie Wonderfulness
I love my hair ties. I have at least one or two on my wrist at all times.... all times. You never know when it's going to get too hot, or too windy, too flay, too frizzy, you name it.. it can and probably will happen.
I've been making my own hair ties for a while and I love them. They don't get stuck in my hair, and they don't pull my hair out when I take my hair down. I can wear a tie that blends into my hair coloring or find a cute brihgtly colored one when I feel like being a little more bold.
I have sold my hair ties at craft fairs, I have given them as gifts and everyone seems to love them, so I thought I'd post a link to my Etsy shop so you can check them out too! They are A LOT cheaper than buying them in store. :)
Check them out here at StaceyBug Creations
Friday, April 19, 2013
Spring Organizing Desk Drawer Edition
Sometimes when you are in a rush, or just being lazy, you just toss things in the drawer they belong into instead of putting away in the drawer. We've all been there, it's ok to admit it... I do it all the time. But no more. A few weekends ago I went to the Container Store and bought some these little beauties when they were on sale (and guess what they are still on sale here.

These great little containers are called Linus™ Shallow Drawer Organizers and they are a staple at The Container Store so even if you miss the sale you can always go and buy them full price.... or wait for them to go on sale again.
Here is my desk drawer before:

It's not terribly messing, but not wonderfully organized either.
So I cleared everything out of the drawer.

I played around with how I wanted my containers to fit in that drawer and started to place everything back in. Sorry no picture here, I didn't think ahead.
And TA-DA.... here is the after! What do you think. Every single thing I pulled out of that drawer I put back in.

It took minutes to clean this drawer out... really. It was so easy and really fun!
I may need to stock up on more of these containers for other drawers in the house. I think I hear the the bathroom drawers asking me to rescue them next.
Sunday, April 14, 2013
No excuse to miss breakfast anymore!
I've always been told that breakfast is the most important meal of the day....and it is. It give you the energy to go,go,go! Being a teacher, I need all of the energy I can get.
I am one of those people who get up, get dressed and I'm out the door in the morning, skipping breakfast and having a snack at 10. Well not anymore.
The hubby got me an Oster My Blend for Easter and I have been using it during the school week every single day. It's pretty amazing. It's a mini blender however it blends into the tumbler you drink out of. So you blend, put the top on and go.
I thought I'd show you what I do to get everything ready for my morning breakfast smoothies.
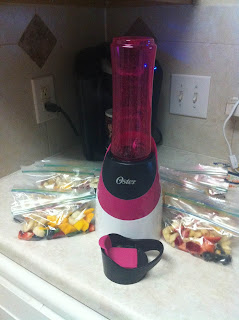
They have a few colors to choose from. The hubs got me pink as you can see.
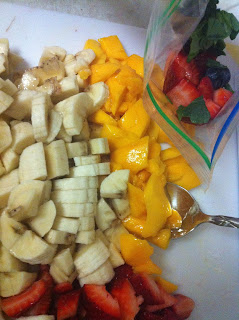
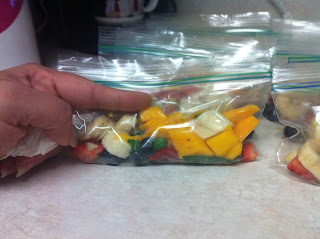
First I chop up all of my fruits and veggies
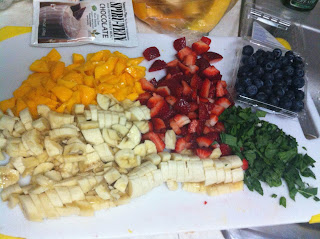
Then I scoop some into snack sized zipper baggies.
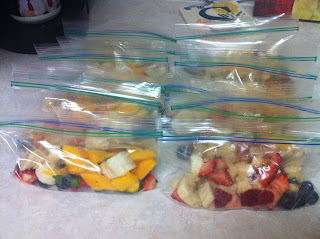
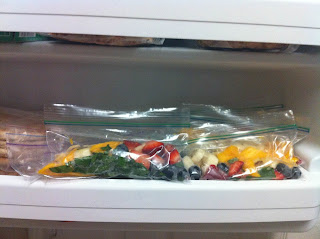
Here are all of my baggies.
Before I zip them closed a push all the fruit and veggie goodness towards the bottom of the bag. This is an important step. I do this, so after the baggies are frozen, I can open them up and slide out the frozen fruit and slides it easily into the tumbler without having to brake it apart to make it fit.
Then I pop them into the freezer.
Come morning, all I do is put a little OJ in the tumbler with one of the baggies of fruit/vegs, blend and a few seconds later I screw on the tap and I'm out the door.
If you live in Texas HEB has these little Oster My Blend Blenders and right now there is a coupon for $10 off. If not, I linked you to their website at the beginning of this post!
I am one of those people who get up, get dressed and I'm out the door in the morning, skipping breakfast and having a snack at 10. Well not anymore.
The hubby got me an Oster My Blend for Easter and I have been using it during the school week every single day. It's pretty amazing. It's a mini blender however it blends into the tumbler you drink out of. So you blend, put the top on and go.
I thought I'd show you what I do to get everything ready for my morning breakfast smoothies.

They have a few colors to choose from. The hubs got me pink as you can see.
First I chop up all of my fruits and veggies

Then I scoop some into snack sized zipper baggies.

Here are all of my baggies.

Before I zip them closed a push all the fruit and veggie goodness towards the bottom of the bag. This is an important step. I do this, so after the baggies are frozen, I can open them up and slide out the frozen fruit and slides it easily into the tumbler without having to brake it apart to make it fit.

Then I pop them into the freezer.

Come morning, all I do is put a little OJ in the tumbler with one of the baggies of fruit/vegs, blend and a few seconds later I screw on the tap and I'm out the door.
If you live in Texas HEB has these little Oster My Blend Blenders and right now there is a coupon for $10 off. If not, I linked you to their website at the beginning of this post!
New Design
I've been playing around with a new layout for the blog as well as a new design. I'm not completely happy with it, but this is what it's going to look like for now. There are few little glitches I need to work out with the header. Stay tuned.
Saturday, April 13, 2013
Ipsy Bag came
So I love trying out new beauty products and joining $10 monthly subscriptions are great. I get delux samples and sometimes full size products I can test out before deciding if it's something I REALLY want to spend my hard earned money on.
I only subscribe to two different ones at the moment. Birchbox and I just started http://www.ipsy.com/ .
I love exploring all of these new products and it saves me a lot of money on buying things that end up not working out!
Here's what I got in this month's ipsy bag.

Be A Bombshell Blush- full size (has a hit of shimmer perfect for spring and summer)-tried it and I love the light pink with a hint of shimmer it leaves.
MicaBeauty Mineral Eyeshadow- delux sample size (which will last for months and months) -haven't tried this yet
Sexy Hair Powder Play- delux sample (great for travel) -I'm saving this for my trip to CA in October.
Sation Nail Lacquer- full size - haven't tried yet, but will be my next polish of choice. I'll post a photo when I repaint my nails.
Cute white bag
Not too shabby for $10 right?
What subscription services do you belong to?
My first Run/Race
I am running my first race, the 5K9 race. I am running with one of my 2 dogs. The race is to help raise money for the Petco Foundation to help out our furry friends. It's such a great cause and it feels great to do something good to help out animals in need.
If you'd like to help out to, click the link below and donate. Every little bit helps and all donations of $25 will get their Tax receipt.
https://secure.eventsonline.ca/events/walkrunwag_pledge/pledgeprofile.php?id=515764a86751a
Thank you so much for your support and donation.
Hugs,
Stacey, Sammy and Pudge

Saturday, April 6, 2013
Want a free t-shirt
Click on the link , you get your free Bill's Custom T's t-shirt! Everyone can use an extra T for working out, laying around the house etc. I just requested mine. First 5,000 people, so go, go, go!
Sunday, March 17, 2013
Getting ready for Spring
Sadly we haven't had much of a winter here. I didn't even get to wear sweaters or sweatshirts, what does that tell you? I was totally bummed, because Winter is my most favorite season. BOO TEXAS AND YOUR WARMISH WINTER! At any rate, I am moving on to Spring hoping that it is a nice cool Spring.
I loved to change out my home decor, wardrobe, scents for each season. So today I wanted I wanted to share with you a little mini Bath and Body Works Spring haul.
Before I start I want to let you know if you have a Bath and Body Works Outlet, get there! They have all of the regular products a normal store would have on top of loads more! They have some amazing EVERYDAY sales that I totally took advantage of the other day.
Ok so onto the haul!
Quick over view of everything I bought.

Let's take a closer look. I LOVE the foaming handsoaps that B&BW has, especially when I can get them for a couple of bucks a piece. These scents are all light and perfect for Spring.
Nectarine Mint and Wild Honeysuckle

Tropical Papaya and Vanilla Berry Sorbet- I was a little unsure of these two thinking they would be SUPER sweet, but they aren't.

Candles... They had their 2 for $20 sale on all of their current 3 wick candles. HOWEVER, they also had 3 wick candles that were on a $7.99 sale.... WHAT? Yes, that's what I said, $7.99. So I picked up 3 that are perfect for Spring going into Summer!
White Sand, Verbena Waters and Raspberry Sun Tea. All 3 are very light scents.

Then I picked up a few mini candles for 99 cents each. I got 2 of each scent since I have a set of matching holders for these little guys.
Coco Lobo, Hot Buttered Rum and White Barn. These were some of the winter and last Summer scents. I also got a bulldog Scentportable for my car. Why a bulldog, well I went to California State University, Fresno, home of Time Out the bulldog. Gotta represent!

The last thing I got is this glass bottle of lotion. It was originally $25 and I got it for $6. It smells like a day spa. The lotion is very light and easy to rub into the skin without it being oily or sticky.

Well there ya go. My house and skin are all ready for Spring.
Saturday, March 16, 2013
Watermelon Cutting 101
So I have discovered an amazing way to cut up a watermelon. I am telling you it is awesome and less work that the traditional way of chopping it up. Thanks to a friend of mine who I was chatting with online yesterday. I tried it, and boy oh boy was she right, so awesome.
Here are the steps with pictures, you're welcome.
*I am using a watermelon knife I got at my grocery store for like $6 and it came with a blade protector.
First cut the top and bottom of the watermelon off. This makes it easier to cut up.

Next start your sharp knife at the top of the watermelon rhine and just follow the line cutting all the way down the side. Don't worry if you don't get it all. You can go back after you have finished and clean it up.

Once you've gone all the way around the melon go back and clean it up, cutting off the parts you missed.

See didn't waste any of the melon really.

Now cut it how you like. Here's how I cut mine.
Cut the melon in half and slice into wedges.

Turn the melon and slice the other direction.

And there ya go. Sliced watermelon, simple and sweet! Please let me know if you tried this and how it worked out for you!

Subscribe to:
Posts (Atom)